Berichten in de categorie ‘Blogbericht’
My pull request was rejected… and I loved it.
Monday, 28 September 2015Back in the day when A-stad (the project I’m currently working on) was born, there were no tests, hardly any code reviews and in the end we were happy if it worked at all.
Though that did seem a good idea at the start (boy, were we fast) rather soon than late we were confronted with reality. Coding like that doesn’t last long, in no time bugs were appearing everywhere and our time was devoted to fixing bugs more than it was to writing new features.
This had to change.
Simple enough… in theory.
“Just” review code, write unit- and functional tests and automate everything. We knew the theory but change came at (quite a) slow pace. Turns out changing habbits is hard. Very hard.
Fast forward 2 years, where our code gets reviewed en our tests run before any pull request is merged into the development branch.
Last week my pull request was rejected. Twice. And at that very moment I was incredibly proud of what we had achieved. Not only are tests a must in new (and changed) code, but code is actually reviewed (instead of merging it after looking at it for a minute), code coverage is important and discussions arise on how we could improve those 10 lines of code into 4 more efficient ones.
At this point I have only one thing to say: well done devs. Well done… 😎
Build your own drone (pt 7) – Reflection
Sunday, 11 October 2015Reflection
Why in the heck would you build a drone?
It’s incredibly fun to build your own drone, but you won’t be able to get it to fly right away. If you’re planning on squeezing in some airtime the same weekend you buy it, you’re better off getting a ready-made one.
But here is my 2 cents: the pleasure of seeing the drone you build with your own 2 hands, flying up in the air, is priceless.
It’s fantastic that you get to choose all the components yourself. Want heavier motors? No problem, just install them! Broke an arm off your frame? Don’t sweat it, get spare parts.
So what did building my own drone cost me?
You mean except from the pounds of chocolate I had to buy to bribe my girlfriend into spending the weekend with me, testflying the drone?
Not too much, in my opinion. Below you’ll find a list in which I tried to sum up all the things I used. Of course it doesn’t contain everything: materials, delivery fees, wrongly orderded pieces, … have all been excluded from the list.
Keep in mind that this is just a start. I’ve been working on my drone and adding/changing parts on the go. (e.g. I installed a new Flight Controller.)
Anyway, about that list:
| Description | Total |
|---|---|
| Frame | 17,03 EUR |
| Motors | 55,72 EUR |
| ESC’s | 31,64 EUR |
| Flight Controller | 19,44 EUR |
| Sender and receiver | 119,47 EUR |
| Power | 68,97 EUR |
| Total | 312,27 EUR |
A more detailed view.
1) Frame
| Amount | Description | p/p | Total |
| 1x | Hobbyking SK450 Glass Fiber Quadcopter Frame 450mm | 17,03 EUR | 17,03 EUR |
2) Motors
| Amount | Description | p/p | Total |
| 4x | Motor NTM Prop Drive Series |
12,26 EUR | 49,04 EUR |
| 4x | NTM Prop Drive 28 Series Accessory Pack | 1,67 EUR | 6,68 EUR |
3) ESC’s
| Amount | Description | p/p | Total |
| 1x | Power Distribution Board | 1,61 EUR | 1,61 EUR |
| 2x | PolyMax 3.5mm Gold Connectors | 1,45 EUR | 2,90 EUR |
| 4x | ESC’s | 5,99 EUR | 23,96 EUR |
| 1x | HXT 4mm to XT-60 Battery Adapter | 2,50 EUR | 2,50 EUR |
| 1m | 1m heat shrink (black) | 0,67 EUR | 0,67 EUR |
4) Flight controller
| Amount | Description | p/p | Total |
| 1x | Flight controller Multi-Rotor Control Board V3.0 (Atmega328 PA) | 14,03 EUR | 14,03 EUR |
| 1x | USBasp AVR Programming Device for ATMEL proccessors | 3,11 EUR | 3,11 EUR |
| 1x | 5.6mm x 21mm M3 Nylon Threaded Spacer (10pc) | 1,51 EUR | 1,51 EUR |
| 1x | 5.6mm x 6mm M3 Nylon Tapped Spacer (10pc) | 0,79 EUR | 0,79 EUR |
5) Sender and receiver
| Amount | Description | p/p | Total |
| 1x | Turnigy 9XR Transmitter Mode 2 | 61,29 EUR | 61,29 EUR |
| 1x | Turnigy 9XR Safety Protected 11.1v (3s) 2200mAh 1.5C Transmitter Pack | 12,80 EUR | 12,80 EUR |
| 1x | 10CM Male to Male Servo Lead (JR) 26AWG | 1,34 EUR | 1,34 EUR |
| 1x | FrSky DF 2.4Ghz Combo Pack for JR w/ Module & RX | 44,04 EUR | 44,04 EUR |
6) Power
| Amount | Description | p/p | Total |
| 1x | Turnigy 3300mAh 3S 30C Lipo Pack | 24,60 EUR | 24,60 EUR |
| 1x | Lithium Polymer Charge Pack 25x33cm JUMBO Sack | 2,40 EUR | 2,40 EUR |
| 1x | HobbyKing™ Lipoly Low Voltage Alarm (2s~4s) | 2,54 EUR | 2,54 EUR |
| 1x | Turnigy Accucel-6 50W 6A Balancer/Charger w/ accessories | 35,19 EUR | 35,19 EUR |
| 1x | HXT 4mm to XT-60 Battery Adapter | 2,84 EUR | 2,84 EUR |
| 1x | Turnigy Battery Strap 330mm | 1,40 EUR | 1,40 EUR |
Build your own drone (part 6) – The power supply
Monday, 4 January 2016Sadly, a drone is not completely magical. It still needs energy to fly.
What seemed really simple at first (connect a battery, click your heels 3 times and voilà: a flying drone), turned out to be one of the most difficult steps in this whole proces for me.
Apparently, Lithium Polymer (LiPo) batteries don’t work in the same way as the small AA-batteries from your standard remote control. Bummer.
What you’ll need
| Amount | Description | Price | Total |
| 1x | Turnigy 3300mAh 3S 30C Lipo Pack | 24,60 EUR | 24,60 EUR |
| 1x | Lithium Polymer Charge Pack 25x33cm JUMBO Sack | 2,40 EUR | 2,40 EUR |
| 1x | HobbyKing™ Lipoly Low Voltage Alarm (2s~4s) | 2,54 EUR | 2,54 EUR |
| 1x | Turnigy Accucel-6 50W 6A Balancer/Charger w/ accessories | 35,19 EUR | 35,19 EUR |
| 1x | HXT 4mm to XT-60 Battery Adapter | 2,84 EUR | 2,84 EUR |
| 1x | Turnigy Battery Strap 330mm | 1,40 EUR | 1,40 EUR |
The battery

Low voltage alarm
The first thing I learned about AA-batteries as a kid, was that it’s ok if you use them so much that they end up dead. The fact that that mostly happens right in the middle of your game, is a whole other issue*.
(*frustration talking here).
The first thing I learned about LiPo batteries, is that you can not let them die. Turns out LiPo batteries aren’t rechargeable once they are drained completely. Should that happen to you, say goodbye because they’re ripe for the bin.
(Yes, there are ways to try and recharge them once they’ve died and yes, I tried that out, but no, none of those tactics are really safe.)

By the way, to avoid your batteries from dying on you mid air, causing your drone to ‘fly’ to the ground at 9,81 m/s2 , it’s of paramount importance (look at me using fancy words) to figure out when your battery is almost dead.
Therefor, let me introduce you to the Low Voltage Alarm. An investment of a whopping 2,54 EUR that will prove to be a sound one. (Ever seen a drone hit someone in the head, when there’s nothing you can do? Neither have I and I intend to keep it that way. My drone missed my girlfriend by a hair and I ‘m still hearing about it. )
How to recharge
Got a handy-dandy standard battery charger lying around? Good for you, but you won’t be able to use it for this project I’m afraid.
You’ll actually need quite a lot of equipment and not only to simply recharge the battery:

The grey bag on the left of the picture is a safety bag. By now, you’ve learned that LiPo batteries are not that safe and that they can easily catch fire. Should that happen, send me a card and thank me for advising you to buy (and use!) this bag. I’d also advice you to hang around while recharging this type of battery so you can keep an eye out for a sudden swelling. (Hint: a swollen battery is bad, bad news.)
So: put your entire battery, except for the two wires, inside the bag. Then, connect one wire to the HXT 4mm to XT-60 Battery Adapter and the other wire to the battery charger (with supplied wires).
By the way, that battery charger comes without power supply, so you might want to provide a 12V power supply for that.
Once you’ve got everything plugged in, set your battery charger to LiPo. In addition to that, make sure the number of cells on the battery and the charger are the same (THIS IS IMPORTANT) and start your balanced charge.
Now for the good news and the bad news.
Good news: once your battery is charged, nothing stops you from flying to your hearts content (or at least until the battery decides it’s done for the day).
Bad news: just because the battery stopped working, doesn’t mean you’re off the clock.
Once you’re done flying, you can’t just put away said battery. You’ll have to reconnect it to the charger that you’ll set on ‘storage’. Once that proces is done, you can disconnect your battery, put it away, grab a beer and be damn proud of yourself.
How to fasten a battery
‘Minor detail’ once you’re flying is that you’ll probably want your battery to hang on there tightly; seeing how you want to be able to control your drone (Believe me, pissed off girlfriends are no joke).
I started of using cable ties but it unnerved me that I had to throw them away after each use.
My go to methode became a sturdy velcro strap but any kind of strong velcro will do.
Once the battery is securely attached, you can connect it to the wire we made in this blogpost.
Now, and only now, click your heels 3 times and voilà: let there be power!
The power of books
Wednesday, 27 January 2016When I learn a new HOTNEWTHING the first thing I usually do goes as follows: I grab my computer, search for HOTNEWTHING en read some pages online.
Then I look (or ask) for a good tutorial for HOTNEWTHING and follow along.
Most of the time I have something working in HOTNEWTHING at the end of the day.
But do I truly understand it?
No. Not at all.
Last Christmas holiday a colleague lent me some books he had reviewed. I was determined to read them during the holiday so I could give them back the day I returned.
Admittedly, I struggled reading them on paper. I found it to be very slow paced; no distractions at all and no link-after-link-after-link I could click because: “Ooh, that’s interesting too”. After years of learning on the internet only, this was a whole new experience.
And a good one. I learned more in depth about nodejs/javascript after reading those three books than I did in the months where I googled.
Secure your Pi
Tuesday, 10 May 2016I’ve been trough this way too many times. So here’s a note (mainly for myself) so you and I know what to do when connecting a Raspberry Pi to the web.
Create a new user
This (low-privileged) user is needed so we don’t need to use our root user to login or run applications (because the amount of rights the latter has is plain dangerous).
You can do that with: sudo adduser username Needless to say you’ll want to change ‘username’ to a username you’d like to use.
Enable key based authentication
Well, this part is explained way better than I ever could on the Raspberry Pi website.
Disable root login over ssh
Now that we have a new user which we can use to login over ssh (tried and tested, right?), we can disable our root login over ssh.
To accomplish this you’ll need to change the /etc/ssh/sshd_config file.
run: vim /etc/ssh/sshd_config
and make sure this is in your configuration file:
PasswordAuthentication no
PermitRootLogin no
Change it if it exists or add it if it doesn’t.
After your changes you’ll need to reload ssh:
/etc/init.d/ssh reload
Please be aware that this only covers the bare basics and you could (and should) do way more to secure your Pi.
Build your own drone (pt 5) – The transmitter and receiver
Saturday, 30 July 2016When flying drones, as in life, communication is important. As long as your drone doesn’t fly autonomously (spoiler alert: this one doesn’t) you will need something so you can control it from a safe distance. That’s why a transmitter and receiver are necessary.
You’ll need
| Amount | Description | p/p | Total |
| 1x | Turnigy 9XR Transmitter Mode 2 | 61,29 EUR | 61,29 EUR |
| 1x | Turnigy 9XR Safety Protected 11.1v (3s) 2200mAh 1.5C Transmitter Pack | 12,80 EUR | 12,80 EUR |
| 1x | 10CM Male to Male Servo Lead (JR) 26AWG | 1,34 EUR | 1,34 EUR |
| 1x | FrSky DF 2.4Ghz Combo Pack for JR w/ Module & RX | 44,04 EUR | 44,04 EUR |
If your flight controller (e.g. the openpilot cc3d) comes with cables, you obviously won’t need the male to male servo lead cables.
The pictures do still show that orange module.
The transmitter (Tx)
Before deciding on brand or pricerange, take a minute to think about your flightmode. The next video explains the difference between both modes
I kind of went loose when choosing my transmitter. You can definitely go for a much simpler (and cheaper) version as long as there are enough channels (at least 4).
Receiver (Rx)
It doesn’t really matter which receiver you choose, but there are a few things to keep in mind:
- Does this receiver work with my transmitter?
- What is the reach of this transmitter?
- Are there enough channels available?(min 4)
- Price?
1. How do I install the receiver?
Attach the receiver securely to your frame. Make sure your antenna’s can’t touch your propellors.
Depending on what Flight Controller you use, you will have to connect the cables in different places.
If you’re using the CC3D, you’re in luck: as you setup the installation on your computer, it will show you a screen that will tell you how to connect everything.

2. How do I install the transmitter?
There’s a big hole in the back of the transmittercase. That’s where you place the transmittermodule. Simply clicking it in place should suffice.
3. Binding
By now both your receiver and your transmitter have been installed. All there is left to do is telling both of them they are a couple. Kind of creepy if we were talking about humans, but luckily when it comes to technology we can just call that ‘binding’ and get on with it.
I could tell you all about how that works, but the next clip does a better job than I ever could:
Et voilà, everything should be up and running by now. Make sure you take it for a testrun without props before actually taking it out on a testflight!
Should you have any questions or want me to go deeper into some topics, leave a comment! I’ll try and make sure I address the missing information in the next post.
Mounting WD My Cloud on Ubuntu
Saturday, 29 June 2019After the january firmware update (2.12.127) I couldn’t mount my Western Digital My Cloud anymore. I took a look at the release notes and sure enough “security was improved“.
That’s probably the reason I got a “mount: /media/NAS: mount(2) system call failed: Connection refused.” everytime I tried to mount the My Cloud.
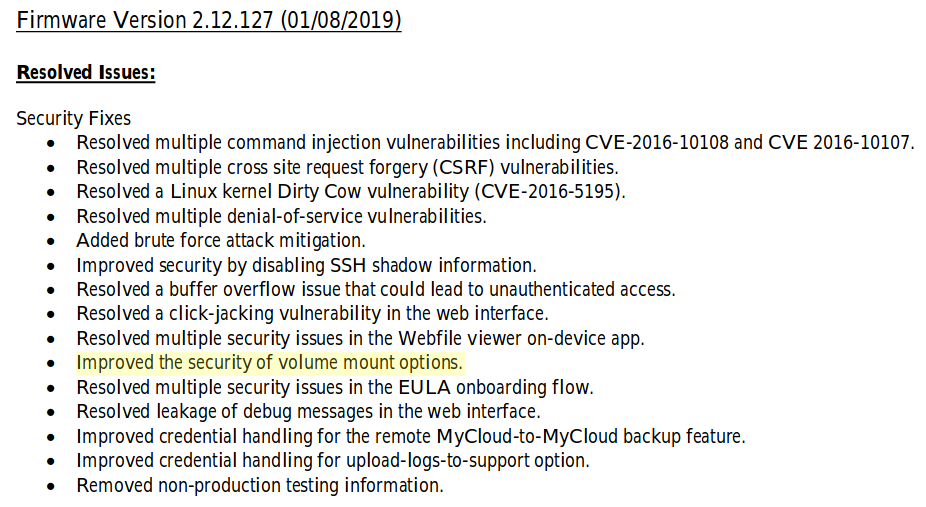
What they didn’t mention was how to fix this. Luckily it’s not that hard.
On your My Cloud
My cloud needs to know who can access the drive and who can not.
Log in on your My Cloud via ssh and edit the exports file:
vi /etc/exports
if Public is the folder you want to mount, just add:
/nfs/Public *(rw,all_squash,sync,no_subtree_check,insecure,crossmnt,anonuid=65534,anongid=1000)
Note that I added a * here which means everyone has access. You should add the ip-address of the client instead.
After this run
sudo service nfs-kernel-server nfs-mountd restart
sudo service nfs restart
On your computer
At this point you should be able to mount your My Cloud again
sudo mount -t nfs MYCLOUD_IP:/nfs/Public /media/NAS/